Getting Started
In the following tutorials, we will create several WebXR Experiences using natuerlich and react-three/fiber. Install the dependencies manually via npm i @coconut-xr/natuerlich @react-three/fiber react react-dom three zustand or use the CodeSandbox provided for each example. When developing locally, ensure you host your code using HTTPS, which is required for WebXR sessions.
Make sure your three.js version is either lower or higher than 0.0.153. s
If you have questions or get stuck, jump into our Discord.
Bare-bones WebXR Experience
Creating the bare minimum for a WebXR experience using natuerlich only requires the useEnterXR hook to create an Enter Button and the XRCanvas. The XRCanvas allows to configure WebXR features, such as foveation, frameRate, referenceSpace, and frameBufferScaling via corresponding optional properties.
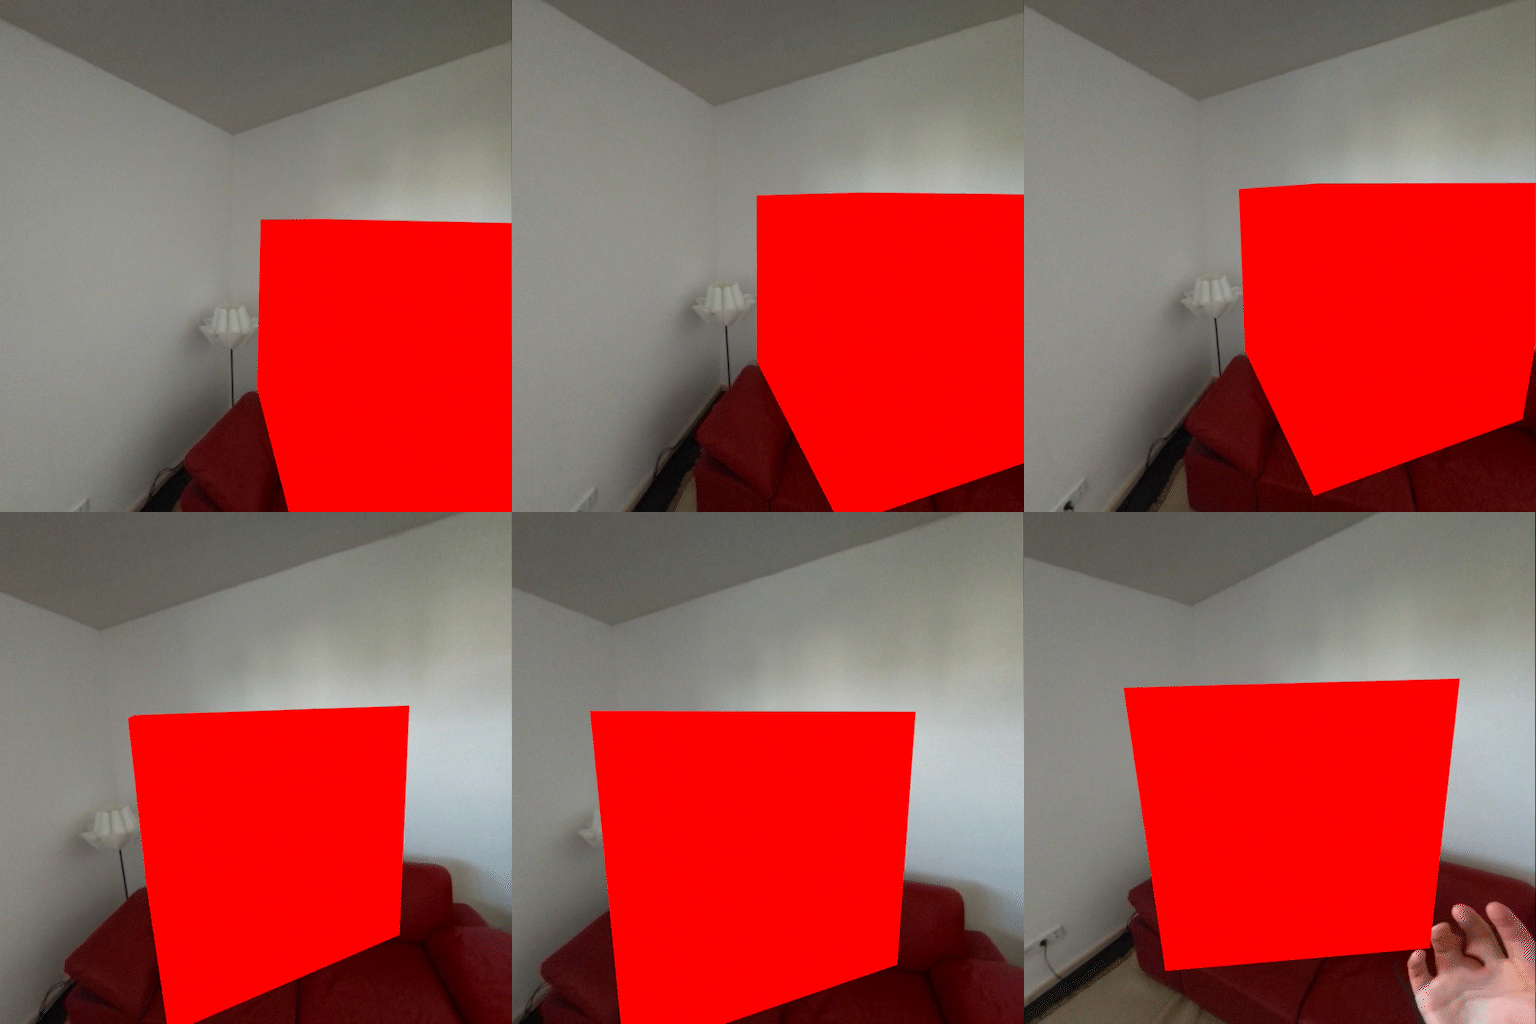
In the following example, we additionally use the NonImmersiveCamera to control the position of the camera when not in VR/AR. We also use the ImmersiveSessionOrigin to control the position of the immersive origin (your feet) in AR/VR.
As a result, in the following example, users are positioned in front of the red cube regardless of whether they are in AR/VR or not.
| Without AR | Inside AR |
|---|---|
 |
import { XRCanvas } from "@coconut-xr/natuerlich/defaults";
import {
  useEnterXR,
  NonImmersiveCamera,
  ImmersiveSessionOrigin
} from "@coconut-xr/natuerlich/react";

const sessionOptions: XRSessionInit = {
  requiredFeatures: ["local-floor"]
};

export default function Index() {
  const enterAR = useEnterXR("immersive-ar", sessionOptions);
  return (
    <div
      style={{...}}
    >
      <button onClick={enterAR}>Enter AR</button>
      <XRCanvas>
        <mesh position={[0, 1.5, 1]}>
          <boxGeometry />
          <meshBasicMaterial color="red" />
        </mesh>
        <NonImmersiveCamera position={[0, 1.5, 4]} />
        <ImmersiveSessionOrigin position={[0, 0, 4]} />
      </XRCanvas>
    </div>
  );
}
In Depth Explanation
Instead of directly using the XRCanvas, the underlying <XR/> component can be used to add WebXR support to a scene. The XR component allows to change the foveation, frameRate, referenceSpace, and frameBufferScaling.
In addition to adding the XR, the event system needs to be overwritten since natuerlich uses xinteraction. Therefore, the events inside the canvas need to be disabled via elements={noEvents}. To enable interaction using normal mouse and touch controls, we are adding the XWebPointers from xinteraction. The XRCanvas automatically applies these changes.
The following code shows how to manually apply, add the XR component and exchange the event system.
import { Canvas } from "@react-three/fiber";
import { XWebPointers } from "@coconut-xr/xinteraction/react";
import { useEnterXR, XR } from "@coconut-xr/natuerlich/react";

const sessionOptions: XRSessionInit = {
  requiredFeatures: ["local-floor"]
};

export default function Index() {
  const enterAR = useEnterXR("immersive-ar", sessionOptions);
  return (
    <div
      style={{...}}
    >
      <button onClick={enterAR}>Enter AR</button>
      <Canvas>
        <XR />
        <XWebPointers />
      </Canvas>
    </div>
  );
}
Adding Basic Interactions
In the following example, we extend the previous code by sorrounding the <mesh> with a Grabbable component allowing the user to point and drag the box using the mouse or touch on mobile devices. If two fingers are used to drag the Grabable it will resize accordingly.
The Grabbable component is one of the default interactions we provide. For more information about writing own interactions using onClick, ... events read the Object Interaction Documentation.
If you want to know more about the specific implementation of the Grabbable component take a look at the code.

import {
  XRCanvas,
  Grabbable
} from "@coconut-xr/natuerlich/defaults";
import {
  useEnterXR,
  NonImmersiveCamera,
  ImmersiveSessionOrigin
} from "@coconut-xr/natuerlich/react";

const sessionOptions: XRSessionInit = {
  requiredFeatures: ["local-floor", "hand-tracking"]
};

export default function Index() {
  const enterAR = useEnterXR("immersive-ar", sessionOptions);
  return (
    <div
      style={{...}}
    >
      <button onClick={enterAR}>Enter AR</button>
      <XRCanvas>
        <Grabbable position={[0, 1.5, 1]}>
          <mesh>
            <boxGeometry />
            <meshBasicMaterial color="red" />
          </mesh>
        </Grabbable>
        <NonImmersiveCamera position={[0, 1.5, 4]} />
        <ImmersiveSessionOrigin position={[0, 0, 4]}/>
      </XRCanvas>
    </div>
  );
}
Adding Controllers and Hands
Next we enable interactions with the Grabbable mesh using Controllers and Hands. This can be achieved through the high-level Hands and Controllers components. Both components take a type, which can be either "pointer", "grab", and "teleport". For Hands the type "touch" is additionally available.
In the following example, we extend the previous code by adding <Hands type="pointer/> and <Controllers type="pointer"/> into the ImmersiveSessionOrigin.
Instead of using the default Hands and Controllers natuerlich also allows to build custom input sources on different levels of abstraction. For a introduction to building your own hands and controllers read the Input Sources Documentation. Additionally, the Custom Input Sources Documentation goes into more detail on building custom low-level input source types.
All objects tracked using WebXR, such as the controllers and hands, must be placed inside the ImmersiveSessionOrigin.
When using hands inside a WebXR session, the "hand-tracking" feature needs to be requested inside the sessionOptions.

import {
  XRCanvas,
  Hands,
  Controllers,
  Grabbable
} from "@coconut-xr/natuerlich/defaults";
import {
  useEnterXR,
  NonImmersiveCamera,
  ImmersiveSessionOrigin
} from "@coconut-xr/natuerlich/react";

const sessionOptions: XRSessionInit = {
  requiredFeatures: ["local-floor", "hand-tracking"]
};

export default function Index() {
  const enterAR = useEnterXR("immersive-ar", sessionOptions);
  return (
    <div
      style={{...}}
    >
      <button onClick={enterAR}>Enter AR</button>
      <XRCanvas>
        <Grabbable position={[0, 1.5, 1]}>
          <mesh>
            <boxGeometry />
            <meshBasicMaterial color="red" />
          </mesh>
        </Grabbable>
        <NonImmersiveCamera position={[0, 1.5, 4]} />
        <ImmersiveSessionOrigin position={[0, 0, 4]}>
          <Hands type="pointer" />
          <Controllers type="grab" />
        </ImmersiveSessionOrigin>
      </XRCanvas>
    </div>
  );
}
Next Up
With this bare-bones setup, you are ready to use all features natuerlich has to offer. The following list contains an unordered list of features and their documentation.
- Interaction with Objects - build interactions with objects
- Interaction with Koestlich - build interactive 3D UIs
- Teleport - building a teleport interaction
- Poses - detecting and generating hand poses
- Guards - conditional rendering using guards
- Layers - high quality content using WebXR layers
- Anchors - spatial anchors using WebXR anchors
- Tracked Planes - tracked planes using WebXR planes
- Tracked Meshes - tracked meshes using WebXR meshes
- Tracked Images - image marker tracking using WebXR Image Tracking
- Head Up Display - placing content in front of the user's camera
- Custom Input Sources - building custom interactive hands and controllers
- Use XR - accessing the raw XR state
- Configuration - configurating foveation, frameRate, referenceSpace, and frameBufferScaling
- All Components - API Documentation for all available components
- All Hooks - API Documentation for all available hooks
If your questions were not yet answered, visit our Discord 😉